How to deploy Laravel 7 application on Linux, Engine-X, MySQL, & PHP Stack using Google Cloud - Virtual Machine Instance (Ubuntu 18.04)
 |
| Laravel on Gcloud |
Let's say you are done with your app and want to deploy it to the Internet so everyone can see your work. In this guide we will learn to deploy Laravel 7 app onto VM Instance - Google Cloud using LEMP stack. LEMP means:
- L - Linux
- E - Engine-X (Nginx)
- M - MySQL
- P - PHP
The LEMP acronyms represents the technologies we will be using to deploy our application. Maybe you are familiar with LAMP acronym, this is almost the same thing. but instead of using Apache server we will be using Engine-X (Nginx).
WHAT HOSTING SERVICE SHOULD WE USE?
In this tutorial, we will be using Google Cloud platform - VM Instance. Why I pick this over the others? I found it very cheap and there is a $300 free credit trial. This trial will expire after 1 year so better to try other service they are offering.
STEP 1: SIGN UP IN GOOGLE CLOUD PLATFORM
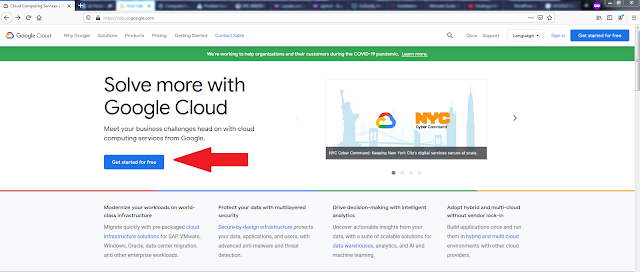
Go to https://cloud.google.com/ and Click Get Started for free.
Login using your Google account (if you don't have one just sign up) and complete the information needed for the site. Google Cloud requires Credit card to get started with their services for FREE. Don't worry they will not yet charge your card with anything.
STEP 2: SETUP VM (Virtual Machine) INSTANCE
A. Access VM Instance
Go to Homepage and click the Menu button in the upper left corner and click Compute Engine and then VM Instance. We expect to see the Compute Engine Dashboard.
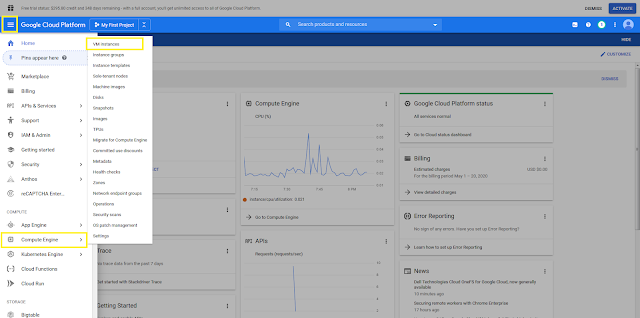 |
| Google Cloud Platform Homepage |
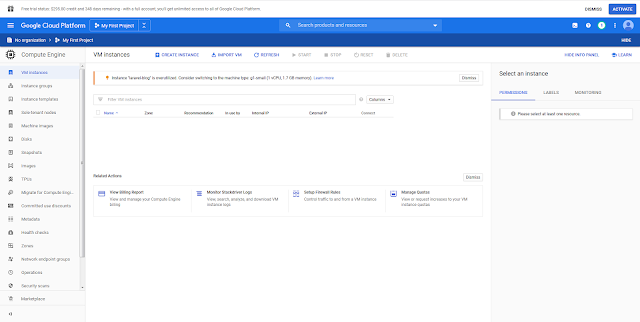 |
| Google Cloud Compute Engine Dashboard |
B. CREATE INSTANCE
On Google Cloud Compute Engine Dashboard, click the CREATE INSTANCE button. We expect to see Create an instance page.
 |
| Create Instance button |
On Create an instance page. input the following details:
- Name: laravel-blog
- You can name it anything
- Region: asia-southeast1 (Singapore), Zone: asia-southeast1-b
- I pick this Region because this is the closest to my locations and target people.
- Machine Configuration
- Machine family: General-purpose
- Series: N1
- Machine-type: Shared Core - f1-micro (1 vCPU, 614 MB memory)
- Boot Disk: Ubuntu 18.04 LTS Minimal
- Change the size to whatever you want, I use 20 GB standard persistent disk
- Firewall: Check Allow HTTP traffic & Allow HTTPs traffic.
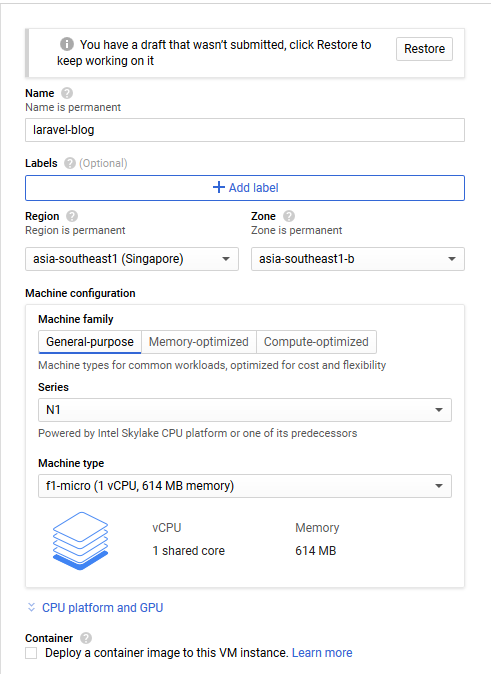 |
| VM Instance Details |
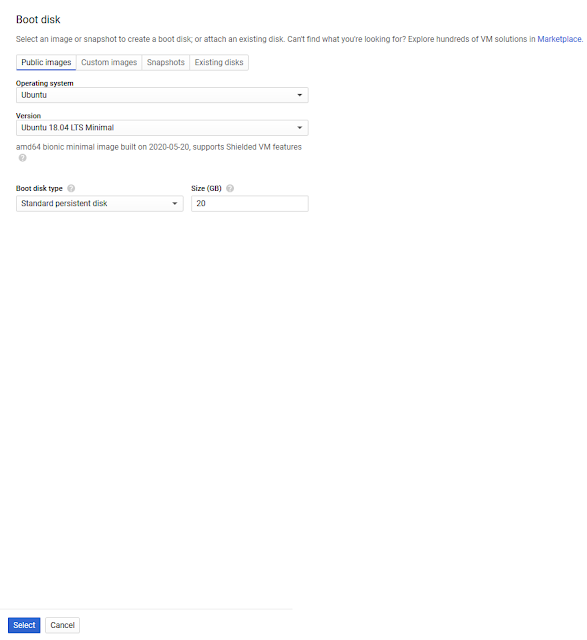 |
| Boot Disk Setup |
 |
| VM Instance Details |
After you click the Create button, Sometimes this will take a time around 1-2 minutes.
C. Access VM Instance using GCloud command
You need to install Gcloud into your PC. Installation is easy you can follow the official document about this: https://cloud.google.com/sdk/docs/quickstart-windows
You also need SSH, I just install Putty: https://www.putty.org/
After you successfully install GCloud & Putty into your windows machine we will access our VM using Gcloud command.
Just copy and paste the command in your CMD.
 |
| View gclound command |
 |
| gcloud command line |
We will expect to see our instance open using Putty client.
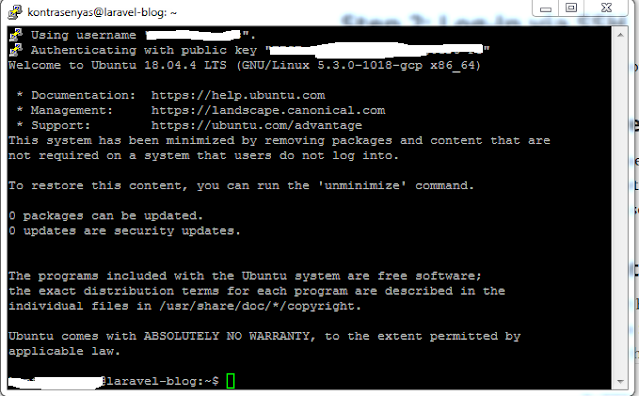 |
| Gcloud command in Putty client |
STEP 3: Update Instance Packages
We will be updating our server using Apt-Get command, this will command will install and update the existing program. This of it like an AppStore or Google play in mobile world.
We need to make sure that Apt-Get installer is updated before using it. To do this just tell it to update with this command:
sudo apt-get update
You will notice that update is faster than other VM servers, since google is continuously updating this package in their server. They know that this commands is always executed every time there is a new instance created.
STEP 4: Install Nginx
Our installer is now updated we can now use it to install new packages in our server. Let's use apt-get to install Nginx in our server.
sudo apt-get install nginx
After the nginx is finish installing we will expect to run it automatically. Try visiting the External IP provided by Gcloud and you will see that Nginx is working. Just access the http one not the https.
 |
| Installing Nginx |
STEP 5: Install MySQL
We are down with Nginx, a server without database is not much useful. Laravel will be a waste if you don't have a database, If you build an application without database maybe you just need a single page only? or just plain HTML. Just kidding.
You are free to install any database, but for this tutorial we will be using MySQL. To instalL MySQL we will be using again the apt-get command:
sudo apt-get install mysql-server
This command will start the installation of MySQL in our server.
Update root password and Add new User
After the installation is done, we will be updating the root password of our database we need to login first in our database, we need to run this command:
sudo mysql -u root
We will alter now the password of our root user using a command:
ALTER USER 'root'@'localhost' IDENTIFIED WITH mysql_native_password BY 'superduperstrongpassword';We also need to create a database user for our vm instance username. We will later use it to setup our .env file. 'yourusername' is the username of your windows credentials pc.
CREATE USER 'yourusername'@'localhost' IDENTIFIED BY '';GRANT ALL PRIVILEGES ON *.* TO 'yourusername'@'localhost';We are done for now using MySQL. Type exit and hit enter to leave the MySQL command line
After adding your username and grating permissions we need to update plugin auth_socket to do this, just use the following command:
UPDATE user SET plugin='auth_socket' WHERE User='yourusername';Secure your MySQL Install
We need to secure our MySQL installation, don't leave it at default settings. Your database will be expose in the world wide web, this doesn't mean MySQL is not secure, just that their default settings is not secure.
Anyway, MySQL has a useful script to setup your default settings to make it secure.
sudo mysql_secure_installation
Depending on your MySQL version it will ask you to install the VALIDATE PASSWORD plugin. For me I don’t think this is necessary since, so I will skip over this setting. (Type ‘N’).
VALIDATE PASSWORD PLUGIN can be used to test passwords
and improve security. It checks the strength of password
and allows the users to set only those passwords which are
secure enough. Would you like to setup VALIDATE PASSWORD plugin?
Press y|Y for Yes, any other key for No:
Next it will ask you if you want to update your root password, but if you create a super duper strong password. Just skip this step by pressing any key (except for 'Y'), if not just change your password using this step.
Next it will ask you if you want to remove anonymous user? Type Y to remove anonymous user, since this is a major risk in your security.
Next it will ask you if you want to Disallow root login remotely? Type Y again for this.
Next it will ask you if you want to Remove test database and all access to it? Type Y again for this.
Next it will ask you if you want to Reload privilege tables now? Type Y again for this.
After this steps, the terminal will you that it is All Done! Yay, we now have MySQL in our server. We have now L E M, the last thing we will install is PHP.
STEP 6: INSTALL PHP
We will not install PHP itself, because Ubuntu has a base setup for this. So instead we will installing PHP for processing. The plugin called is php-fpm "FastCGI Process Manager".
We also need to install php-mysql, so that php will allow to talk to MySQL. And lastly, we need to install php-mbstring, since this is a requirement for Laravel.
sudo apt-get install php-fpm php-mysql php-mbstring php-xml php-zip
STEP 7: CONFIGURING PHP
With everything installed in our server, we need to configure some things to get it working. In your terminal open up your php.ini file in whatever text editor you want to use. I am using nano for this tutorial.
There is no built in nano editor in this machine so we will install it.
sudo apt-get install nano
After installing the nano editor we will open now the php.ini file by this command:
sudo nano /etc/php/7.2/fpm/php.ini
The line we need to edit is cgi.fix_pathinfo=1 you can search it using the command Ctrl + W and now type cgi.fix_pathinfo= and press enter. This will take you exactly where the line of code is. Delete the semicolon ; in front of the line and change 1 to 0 and save the file, this should look like this:
 |
| cgi.fix_pathinfo |
To save in Nano editor, just press Ctrl + X and type Y then press Enter
To see our changes to take effect, we need to restart php.
sudo systemctl restart php7.2-fpm
STEP 8: CONFIGURING NGINX
This is a tricky part so lets focus on configuring our server engine. We need to edit the configuration file of Nginx, to do this just open up the file using Nano editor or what you want.
sudo nano /etc/nginx/sites-available/default
You will notice that there is a lot of # comments in the file, lets ignore that for now and focus on the specific lines we will be editing.
server {listen 80 default_server;
listen [::]:80 default_server;
root /var/www/html;
index index.html index.htm index.nginx-debian.html;
server_name _;
location / {
try_files $uri $uri/ =404;
}
}
Notice that there is no index.php in this part of code. The first thing we need to change is to add index.php to be recognize by our server engine.
In the line with all of the index, we will add index.php in this specific line. This part of line tell our server to what to look first.
server {listen 80 default_server;
listen [::]:80 default_server;
root /var/www/html;
index index.php index.html index.htm index.nginx-debian.html;
server_name _;
location / {
try_files $uri $uri/ =404;
}
}
The server now by default will look first the index then index.php then index.html and so on in our directory /var/www/html.
Next thing we need to do is to add our IP address or External IP to the server_name line. This tells Nginx what domain to use. I am currently using an IP Address in this tutorial since we don't have a domain name, but if you have feel free to use your domain name.
server {listen 80 default_server;
listen [::]:80 default_server;
root /var/www/html;
index index.php index.html index.htm index.nginx-debian.html;
server_name 34.96.191.43;
location / {
try_files $uri $uri/ =404;
}
}
We are not yet done, we need to edit some lines of code to use the php-fpm we just installed earlier. There is a first location block in this file, we will leave this for now and configure it later for 404 error.
For now we will focus in the second location block in this file.
The third location block in the file will be the one who is responsible for blocking .htaccess This is because .htaccess is use in Apache, we are using Nginx in this tutorial. Laravel sometimes has a .htaccess so we need to ignore this.
The changes we need to do is in highlighted with red color, feel free to copy and paste it or if you want is uncomment the original one and just follow this lines of code, just be sure to leave fastcgi_pass 127.0.0.1:9000 commented out.
server {listen 80 default_server;
listen [::]:80 default_server;
root /var/www/html;
index index.php index.html index.htm index.nginx-debian.html;
server_name 34.96.191.43;
location / {
try_files $uri $uri/ =404;
}
location ~ \.php$ {
include snippets/fastcgi-php.conf; fastcgi_pass unix:/run/php/php7.2-fpm.sock; }
location ~ /\.ht { deny all; }}
So for now Save the file using Ctrl + X then type Y then press Enter.
sudo nginx -t
If everything is correct you will see something like this
nginx: the configuration file /etc/nginx/nginx.conf syntax is ok
nginx: configuration file /etc/nginx/nginx.conf test is successful
This means that there is no error in our configuration file. Yay!. So we need to restart our engine to take effect our changes.
sudo systemctl reload nginx
With this configuration we are now ready to deploy our Larave 7 Application in our server.
STEP 8: CREATE A LARAVEL FOLDER
We will be creating a folder inside /var/www/ directory to do this just type this command in your terminal.
sudo mkdir -p /var/www/laravel
Now that we have a folder to store our Laravel application, we will now update again our Nginx configuration file to look into this directory.
In order to update the file just open up again sites-available/default
sudo nano /etc/nginx/sites-available/defaultThen edit the part of line where the root is located. You will notice that I added public, laravel index.php is located inside of the public folder.
server {listen 80 default_server;
listen [::]:80 default_server ipv6only=on;
root /var/www/laravel/public;
index index.php index.html index.htm;
server_name 34.96.191.43;
location / {
try_files $uri $uri/ =404;
}
We will now successfully tell our engine that look into laravel public directory.
We also need to tell our engine to accept query data, since index.php accepts it. We need to update the first location block in our file. Just update the highlighted in red.
server {listen 80 default_server;
listen [::]:80 default_server ipv6only=on;
root /var/www/laravel/public;
index index.php index.html index.htm;
server_name 34.96.191.43;
location / {
try_files $uri $uri/ /index.php?$query_string;}
Now make sure to save the file using Ctrl + X and then Y and then press the Enter key. After saving we need to restart our engine.
sudo service nginx restartIf everything is right we expect to see a 404 not found error page. That's a good thing to see.
STEP 9: CREATE A SWAP FILE (RECOMMENDED)
This is recommended in this tutorial since we get a cheap machie we don't have much RAM and CPU so we will optimize the performance of the machine by creating a swap file. If you want to see your cpu and ram ussage, just type htop in your terminal. This swap only helps if you have low memory usage so don't alot more on this thinking that your machine will get faster.
Now, we will create 1 G swap file in this server, just type this command in your terminal
sudo fallocate -l 1G /swapfile
sudo dd if=/dev/zero of=/swapfile bs=1024 count=1048576
sudo chmod 600 /swapfile
sudo mkswap /swapfile
sudo swapon /swapfile
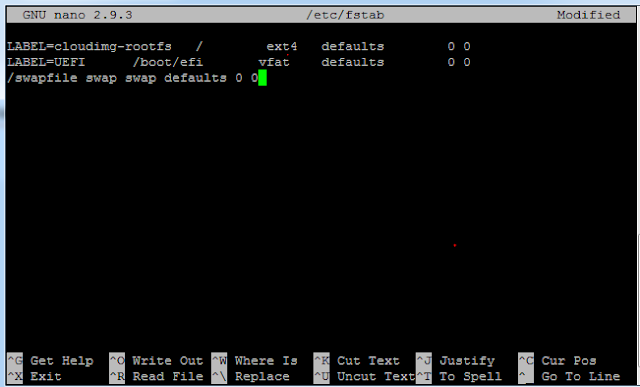
When server restarts we want to make sure that swapfile is on to do this we need to edit fstab file. Open it using nano editor.
sudo nano /etc/fstab
Then add this line at the end of the file
/swapfile swap swap defaults 0 0It will look like this, save your file (Ctrl + X then type Y and press Enter)
And to make sure that everything is correct just run this command in your terminal.
sudo mount -a
STEP 10: INSTALLING COMPOSER
I think you know how to install composer, otherwise you wouldn't reach this point of tutorial or journey if you don't know how to install composer. To install, we will be using apt-get.
sudo apt-get install composerThere isn't much in this step. If you use apt-get to install your package this will be available globally.
STEP 10: CONFIGURING GIT
I think the best way to transfer files from your local development environment to this server is by using GIT, if you use sftp i think its not secure and much slower than using GIT.
We need to create directory to hold our git files. I will put the directory near the nginx folder of /var/www/laravel/
cd /var
sudo mkdir repo && cd repo
This will move us to the new directory repo. You should be inside of repo to make another directory and execute the next command.
sudo mkdir site.git && cd site.git
sudo git init --bare
Maybe --bare is new to you. This option is generally used for servers like this, a bare repo is special kind of repo that will receive a push from the developer. There is a more detailed explanation of this in official git website.
The directory also must also be own by your username so we need to chown site.git and laravel directory. If we don't do this, hooks will not work because of permission.
sudo chown username -R /var/repo/site.git
sudo chown username /var/www/laravel
We also need to add our username to www-data group so that it can perform some action in the server.
sudo usermod -a -G www-data username
Just remember change all username to your actual username. We now have a bare git repository in /var/repo/site.git. Yay!!!
STEP 11: CONFIGURING GIT HOOKS
Move to /hooks folder of site.git directory we just created earlier. And we will create a post-receive inside of this folder.
Now you will see a blank editor, just type the 2 lines in the editor and save the file.
Now save and exit the editor (Ctrl + X then press Y and Enter).
cd /var/repo/site.git/hooks
sudo nano post-receive
Now you will see a blank editor, just type the 2 lines in the editor and save the file.
#!/bin/sh
git --work-tree=/var/www/laravel --git-dir=/var/repo/site.git checkout -f
Now save and exit the editor (Ctrl + X then press Y and Enter).
The post-receive file needs execution permissions in order to copy these files over.. Make sure you are still in /var/repo/site.git/hooks/ folder then type this command:
sudo chmod +x post-receive
We are now done for our server right now. Exit your terminal using exit command ot just close the terminal directly.
STEP 12: SETUP OUR LOCAL DEVELOPMENT ENVIRONMENT TO PUSH TO OUR SERVER
We will setup an automatic push of our commits to our server, as I mention earlier we will not using ftp to transfer from our local to the server instead we will be using git hooks.
Now cd to your development directory and type this command to add git remote in your local.
git remote add production ssh://username@35.198.251.82/var/repo/site.git
Make sure to change the username (windows username) and the external IP to your actual IP
Since we are pushing using ssh, we need to update out git config file in our local development server. Now change directory to C:\Program Files\Git\etc\ssh and edit the file ssh_config to add the host you are connecting to
Host 34.96.191.43
   Identityfile ~/.ssh/google_compute_engine
It would like this if you updated your ssh_config file
 |
| ssh_config |
Now we are done for our local development environment.
Now we can try if the hooks is now working and assuming that your code is in master branch.
git push production master
The output is almost the same with git push just as only we are pushing in our Virtual Machine.
Now go back to your virtual machine and go to your directory, we expect to see our files in /var/www/laravel.
STEP 13: RUNNING COMPOSER INSTALL
Now that we setup our git in our local and successfully push in our server. We need to install laravel packages using composer. Just go to your directory /var/www/laravel and run the command:
cd /var/www/laravel/
composer install --no-dev
Make sure to add --no-dev because if you include it there will be alot of packages will install that you wouldn't need in your production environment.
STEP 14: LARAVEL PERMISSIONS
Nginx needs a certain permissions for our Laravel directory that we made earlier. We need to change the ownership of all sub directories and its main directory.
Now the www-data groups owns the laravel directory. Next thing is to give www-data web group write permission. This directory contains our log files, cache, and file uploads
sudo chown -R :www-data /var/www/laravel
Now the www-data groups owns the laravel directory. Next thing is to give www-data web group write permission. This directory contains our log files, cache, and file uploads
sudo chmod -R 775 /var/www/laravel/storage
We also need to change /bootstrap/cache folder to make it writable because base on Laravel documentation this must be a writable.
sudo chmod -R 775 /var/www/laravel/bootstrap/cache
Now go to your IP address and see what happens. We will expect to see something like this.
 |
| 500 Laravel Error page |
Yay! This is a Laravel Error page. That's a good news. this means that our Laravel application is working now in Nginx server.
If you look on /laravel/storage/laravel.log file you will notice the error something like this.
 |
| Laravel log |
[2020-05-23 04:28:56] production.ERROR: No application encryption key has been specified. {"exception":"[object] (RuntimeException(code: 0): No application encryption key has been specified. at /var/www/laravel/vendor/laravel/framework/$
[stacktrace]
[stacktrace]
The error means that you don't have yet application generated. So next thing we need to do is copy .env.example and rename it to .env. We will cover this in STEP 16.
STEP 15: DATABASE SETUP
If the previous step is error, it means that you don't have Database setup yet. That's okay because we want database in our Laravel application.
Assuming you did not exit your ssh and still in your virtual machine instance. Login to your mysql using this command.
mysql -u root -p'superduperstrongpassword'If you successfully login in your mysql we will expect to see the changes in your terminal.
mysql>
Ofcourse we need to create a Database for our application. To do this, just type the command.
CREATE DATABASE blog;Just replace the hightligthed red color of what database you want. After that exit now mysql.
exit
You will see in your terminal MySql say's Bye!. haha
STEP 16: CONFIGURING LARAVEL
For Laravel application to works completely, we need a configuration file. Maybe you have created yours but if you push it in git, it won't include because of security purpose. So we need to copy .env.example to .env file to do this just type this command:
cd /var/www/laravel
sudo cp .env.example .env
After you copy, generate the key using artisan command
sudo php artisak key:generate
Now open your .env file using nano editor
sudo nano .env
Yo've reach this far and I know you know how to configure Laravel .env file. But for this tutorial we will see the basic .env file changes we need to do.
APP_NAME=LaravelAPP_ENV=productionAPP_KEY=SomeRandomString
APP_DEBUG=falseAPP_URL=34.96.191.43 LOG_CHANNEL=stack
DB_CONNECTION=mysql
DB_HOST=127.0.0.1
DB_PORT=3306
DB_DATABASE=blogDB_USERNAME=usernameDB_PASSWORD=superduperstrongpassword
BROADCAST_DRIVER=log
CACHE_DRIVER=file
QUEUE_CONNECTION=sync
SESSION_DRIVER=file
SESSION_LIFETIME=120
REDIS_HOST=127.0.0.1
REDIS_PASSWORD=null
REDIS_PORT=6379
MAIL_MAILER=smtp
MAIL_HOST=smtp.mailtrap.io
MAIL_PORT=2525
MAIL_USERNAME=null
MAIL_PASSWORD=null
MAIL_ENCRYPTION=null
MAIL_FROM_ADDRESS=null
MAIL_FROM_NAME="${APP_NAME}"
AWS_ACCESS_KEY_ID=
AWS_SECRET_ACCESS_KEY=
AWS_DEFAULT_REGION=us-east-1
AWS_BUCKET=
PUSHER_APP_ID=
PUSHER_APP_KEY=
PUSHER_APP_SECRET=
PUSHER_APP_CLUSTER=mt1
MIX_PUSHER_APP_KEY="${PUSHER_APP_KEY}"
MIX_PUSHER_APP_CLUSTER="${PUSHER_APP_CLUSTER}"Just change the highlighted color red that match your credentials.
Save the file and exit (Ctrl + X, type Y, then press Enter)
To take effect our changes we need to run the following command in our root folder /var/www/laravel
cd /var/www/laravel
sudo php artisan config:cache
We will expect to see something like this in our terminal.
Configuration cache cleared!Configuration cached successfully!That's it for our laravel configuration.
STEP 17: DATABASE MIGRATION
Now we've done configuring our laravel app and now ready to migrate our database. Just use artisan command to do this, in your Laravel directory just type this command.
cd /var/www/laravel
sudo php artisan migrate
sudo php artisan db:seed
If you run this command they will warn you if you want to continue, just type Y if you want to continue now otherwise No.
If you have images in your folder sometimes its not working, so we need to do storage link
sudo php artisan storage:link
If everything went fine, we will see working Laravel Application with Database!
That's It. Hope it helps you a lot!

This comment has been removed by the author.
ReplyDeleteSwt ka po
ReplyDelete